If you want to create a blog without having to invest money, blogger platform is the number one way of doing so. In my previous post, I discussed how to Make Money through Blogging. You may read that before you star.
This tutorial is the first tutorial in "step by step blogger tutorials" series. In that post, I have provided a list of all tutorials regarding blogger platform that is arranged sequentially. Follow that sequence to avoid any trouble in process of learning.
What you have to do
- Creating a Google account and signing in to blogger.com
- Creating a blog
- Customizing blog setting
- Designing the blog
How to Create a Free Blog on Blogger
Step 1 - Creating a Google account and signing in to blogger.com
First of all, you need a google account to create a blog on blogger. If you don't have an account, you will have to create one. If you have an account, you can use it.
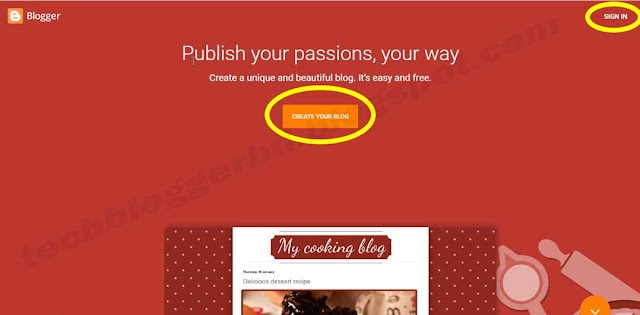
Now, go to blogger.com. Then, click on "SIGN IN" button. Now, it will ask for your email/username and password (google account).
Step 2 - Creating a blog
you may either "Create a Google+ profile" (or use an existing Google+ profile) or create "Create a limited blogger profile". If you select Google plus, Blogger will show your google plus account as an author. If you want to use a different name or limit exposure to your audience, select limited blogger profile. In this tutorial, we will use a limited blogger profile. You can switch it to Google plus profile anytime.
Now it will take you to the following screen. Next, Click on "CREATE YOUR BLOG". A pop-up window will appear.
Enter your blog's name (not your personal name) in "Title" field.
Enter your blog's address/domain in "Address" field
Then, select a "Template" and click on "Create blog" button.
Then, select a "Template" and click on "Create blog" button.
Now, your blog creation is completed. Blogger will take you to the following page. From now on, if you log in to blogger, you will redirect to this page.
But, before start using blogger, complete following 2 steps.
Step 3 - Customizing blog setting
In this step, we will change some important settings. To do that, click on "Settings" from the left sidebar. Then click on "Basic". Here you can change your blog Title. Again, you can give a blog description to your readers. Another important thing is "Privacy". To make change click on "Edit". You can see 2 options. Select "yes" for both options and click on "Save change".
After that, go to the next setting called "Posts, Comments, and Sharing". Follow the image given below. Change the settings like it.
After that, change "Language and formatting" based on your location.
Step 4 - Designing a blog in Blogger
Our next thought will be about our blog design. Many beginners avoid this step. Some do too much to design a blog. The important thing is the number of your visitors and ranking of your blog in Google search depend on your blog design. Question is how? The answer is when you do too much. When you surf the net, you may notice that some blog take a lot of time to load. One of the reasons can be blog design. So what you should do? Just don’t make your blog a garbage truck. Your blog should look simple and professional. It should be comfortable to read posts. As an example, you should not use red background behind black post fonts. You should use a whitish background for that.
You can use blogger theme to design your blog. Those themes will not create these kinds of problems. But, if you want to use Theme from outside, you should be careful.
To design your blog in blogger, click on "Theme" from the left sidebar of your blog's dashboard.
Next, click on "Customize"
From next page click on "Theme" and select your preferred theme from the list. Below the lower half your of the page, you can see a preview section where you can check your blog's look.
Next, click on "Background" to change background image and color.
Then, click on "Adjust Width" to change your blog's and sidebar's width.
After that, click on "Layout" to add or rearrange gadgets of your blog.
From "Advanced" option you can change the color and size of the text of your blog, tabs, posts, etc. But, don't do anything with "Add CSS".
Now, preview the blog before applying changes. At last click on "Apply to Blog" from upper right corner of the screen. Done!
Next- follow this-
How to Submit Blogger Sitemap To Google Search Console
Next- follow this-
How to Submit Blogger Sitemap To Google Search Console


1 comments:
Click here for commentsGreat post!
ConversionConversion EmoticonEmoticon